In my last post, Building a Developer Virtualization Lab - Part 1, we set up Promox 3.4 on a single node on a Dell C6100. Since that post one thing has changed, I was able to get the vagrant-proxmox plugin to work with the latest version of Proxmox (as of this writing, version 4.4). Given that we are now able to use the latest version, the goals for this article are to:
- Install Promox 4.4 on all 4 nodes.
- Configure a Promox cluster.
- Configure users, groups and ACLs appropriate for Vagrant.
- Create a base CentOS 7 template to work with Vagrant.
- Install the vagrant-proxmox plugin and provision a CentOS VM.
- Demonstrate a Vagrantfile debugging technique when using the vagrant-proxmox plugin. This was critical in solving my problem of getting the plugin to work with Proxmox 4.4 and Linux Containers (LXC).
Install Proxmox 4.4
1. Begin by downloading the Proxmox 4.4 ISO.
2. Create a bootable USB disk. If you are running OS X, start by opening a terminal.
3. Convert the Proxmox ISO to an Apple disk image (*.dmg).
$ hdiutil convert -format UDRW -o proxmox-ve_4.4-eb2d6f1e-2.img proxmox-ve_4.4-eb2d6f1e-2.iso4. Run diskutil to determine your USB device disk. Then, unmount the disk and us dd to write the image to the USB device. In my case:
$ diskutil list
$ diskutil unmountDisk /dev/disk2
$ sudo dd if=proxmox-ve_4.4-eb2d6f1e-2.img.dmg of=/dev/disk2 bs=1m
5. Ensure that you have CPU virtualization (i.e. Intel VT-x support) enabled.
6. Remove the USB disk and install Promox on all the nodes. The installation is straight forward; simply, follow the installation screens.
Add Proxmox Hosts to DNS
Given that we are configuring a cluster of Proxmox nodes, it is critical that each node has working forward and reverse DNS records. While configuring DNS is out of the scope of this post, I personally run pfSense as my router solution with DNS forwarding enabled. (See my article on my home network set up using pfSense if you're interested.) The DNS forwarding service allows you to statically define ad-hoc DNS entries similar to a local /etc/hosts file without the need for running a full blown DNS service like BIND.

pfSense DNS entries for Promox using DNS Forwarding.
Create a Proxmox Cluster
For detailed documentation on configuring a cluster, refer to the Proxmox VE 4.x Cluster wiki page. For my setup, I have four nodes:
- pve-n1.localdomain (192.168.5.101)
- pve-n2.localdomain (192.168.5.102)
- pve-n3.localdomain (192.168.5.103)
- pve-n4.localdomain (192.168.5.104)
I decided to call my cluster glab (Gaston's Lab). Then, I logged into my first node and created the cluster.
$ ssh root@pve-n1
root@pve-n1:~# pvecm create glab
After creating the cluster, I logged into nodes 2, 3, and 4 and added them to the cluster. The pvecm add command takes the the first node's IP address or hostname. It will prompt you for the root password on the first node so that it can copy the SSH public key to the other nodes.
$ ssh root@pve-n2
$ pvecm add pve-n1

$ ssh root@pve-n3
$ pvecm add pve-n1

$ ssh root@pve-n4
$ pvecm add pve-n1
Check the status of the cluster by running: pvecmd status. This can be run on any node.
root@pve-n1:~# pvecm status
Quorum information
------------------
Date: Mon Dec 26 14:08:45 2016
Quorum provider: corosync_votequorum
Nodes: 4
Node ID: 0x00000001
Ring ID: 1/5860
Quorate: Yes
Votequorum information
----------------------
Expected votes: 4
Highest expected: 4
Total votes: 4
Quorum: 3
Flags: Quorate
Membership information
----------------------
Nodeid Votes Name
0x00000001 1 192.168.5.110 (local)
0x00000002 1 192.168.5.120
0x00000003 1 192.168.5.130
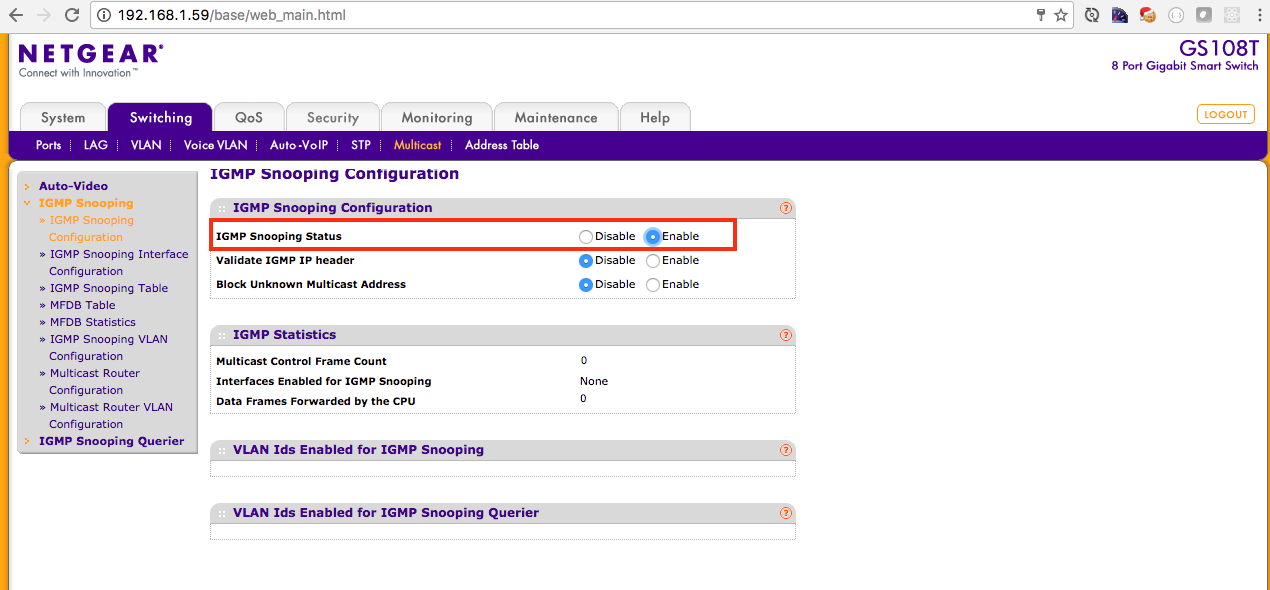
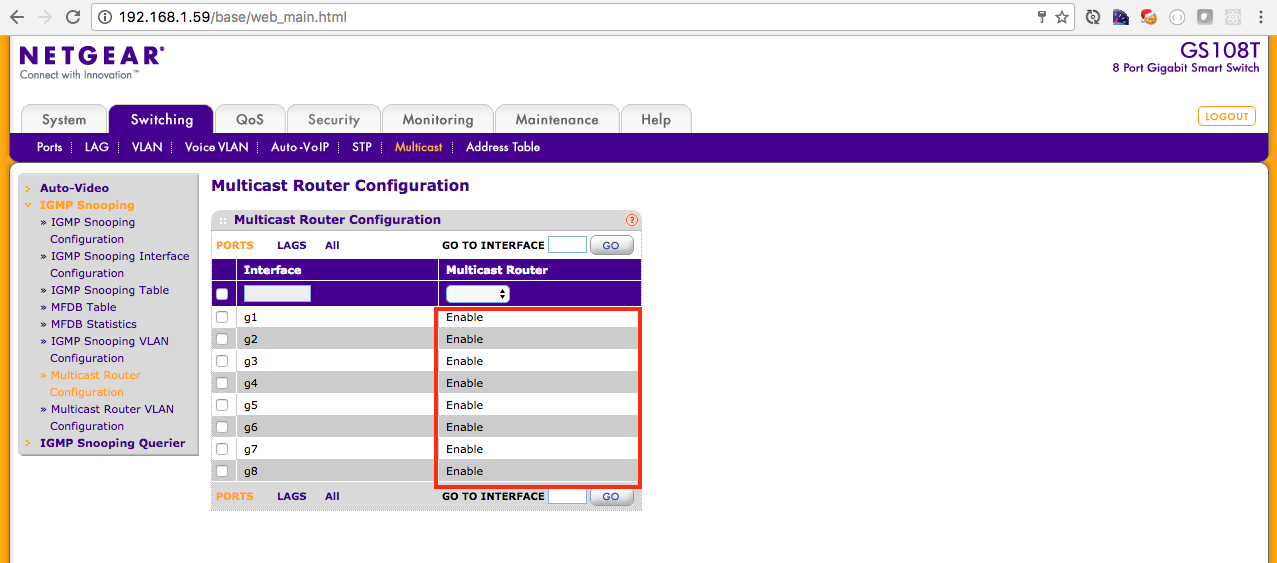
0x00000004 1 192.168.5.140Lastly, ensure that your network is configured correctly for multicast. By default my Netgear GS 108T Switch had multicast disabled by default. I had to enable a few settings in the Netgear management interface. Consult your respective switch documentation.
For additional information on the network requirements for Promox clustering refer to Multicast notes.
Now, we can log into any of the nodes via the Web UI (https://<proxmox node>:8006) and view our cluster. Finally, it looks like my original dilemma is almost solved! I have a total of 32 cores and ~48 GB of RAM at my disposal for running my VMs remotely. If I ever hit the resource limits on this machine, I can always purchase more RAM for each node and more disk capacity. Heck, I can even purchase another Dell C6100 with four more nodes.
Add a CentOS 7 Container Image
1. Begin by logging into the first node via SSH.
$ ssh root@pve-n12. Update the list of available Linux Containers (LCX).
root@pve-n1:~# pveam update3. Search for a container image. I am a fan of CentOS 7 given that it's the closest Linux distribution that models typical server deployments.
root@pve-n1:~# pveam available | grep -i centos
system          centos-6-default_20161207_amd64.tar.xz
system          centos-7-default_20161207_amd64.tar.xz
3. Download the container image to your local storage.
root@pve-n1:~# pveam download local centos-7-default_20161207_amd64.tar.xz4. Ideally, you should use shared storage in a cluster; however, I do not have the infrastructure at home for network attached storage (yet). As such, I repeated steps 1 - 3 on the other nodes.
Navigate to Storage View > node > local (node) > Content to confirm that the container image has been added.
Add a Promox User
Optionally, create a Vagrant user so that the vagrant-plugin can manage VMs without using root's credentials in your Vagrantfile. Promox supports multiple authentication realms—namely, PAM for logging in using Linux system accounts and Proxmox VE Authentication Server. We will use the latter.
Note: It is only necessary to run the commands below on a singe node. The account will propagate to the other nodes in the cluster.
1. Log into the fist Proxmox server as root via SSH or the console.
2. Create a vagrant group.
root@pve-n1:~# pveum groupadd vagrant -comment "Vagrant group"3. Allow the vagrant group to manage the root as a Proxmox administrator.
root@pve-n1:~# pveum aclmod / -group vagrant -role PVEAdmin4. Create a vagrant user and assign it to the vagrant group.
root@pve-n1:~# pveum useradd vagrant@pve -group vagrant -passwordBuild a Vagrant-compatible CentOS 7 Template
The container image (or template) that we installed earlier should be customized to work nicely with Vagrant. Additionally, it is an opportunity to add a few customizations to the base CentOS 7 image based on your needs.
Create a CentOS 7 Container
1. Log into the Proxmox web GUI and create a new container. Once logged in, click the Create CT button. Since we created a dedicated user called vagrant in the last section with admin privileges, we can use that user to login. Ensure that you select Proxmox VE Authentication Server as the authentication type.
2. For the base container, I used the following settings. However, you will need to adjust the values based on your environment.
- General
- Node: pve-n1 (default)
- VM ID: 101 (default)
- Hostname: centos7-base
- Resource Pool: <blank>
- SSH public key: <blank>
- Template
- Storage: local (default)
- Template: centos-7-default_20161207_amd64.tar.xz
- Root Disk
- Storage: local-lvm (default)
- Disk size (GB): 80 GB
- ACLs: Default (default)
- Enable quota: unchecked (default)
- CPU
- Cores: 4
- Memory
- Memory (MB): 4096
- Swap (MB): 2048
- Network
- Name: eth0 (default)
- Bridge: vmbr0 (default)
- VLAN Tag: no VLAN (default)
- Rate limit (MB/s): unlimited (default)
- Firewall: unchecked (default)
- IPv4: Static (default)
- IPv4/CIDR: 192.168.5.111/24
- Gateway: 192.168.5.1
- DNS
- DNS Domain: localdomain
- DNS server 1: 192.168.1.1
2. From the Web UI, select the Server View from the drop down menu, navigate to the node where you created the container and start it.
3. From the Web UI, click the Console button and log in.
4. Update CentOS 7 to ensure that you have the latest patches.
[root@centos7-base ~]# yum update -y5. Install basic networking utilities (ifconfig), rsync, sudo and sshd. You can add other packages based on your base CentOS 7 needs.
[root@centos7-base ~]# yum install -y net-tools rsync sudo openssh-server6. Start the SSH daemon and configure to start on start up.
[root@centos7-base ~]# service sshd start
[root@centos7-base ~]# chkconfig sshd on
7. Create a vagrant user.
[root@centos7-base ~]# useradd vagrant8. Allow the vagrant user to become root without specifying a password. Run: visudo, then add the following lines:
Defaults:vagrant !requiretty
vagrant ALL=(ALL) NOPASSWD:ALL
9. Create an SSH key pair on your local workstation. Most Vagrant boxes use the SSH private/public key pair from https://github.com/mitchellh/vagrant/tree/master/keys. This key pair is insecure as everyone in the world has access to the private key. As such, we will generate a new SSH key pair on our local workstation.
$ mkdir ~/vargrant-keys
$ chmod 700 ~/vargrant-keys
$ ssh-keygen -t rsa -C "Vagrant SSH key" -f ~/vagrant-keys/vagrant -N ""
10. From your local workstation, run the following to set up the SSH public key on the container.
$ ssh root@YourVmIpAdddress 'mkdir /home/vagrant/.ssh'
$ scp ~/vagrant-keys/vagrant.pub root@YourVmIpAdddress:/home/vagrant/.ssh/authorized_keys
$ ssh root@YourVmIpAdddress 'chmod 700 /home/vagrant/.ssh'
$ ssh root@YourVmIpAdddress 'chmod 600 /home/vagrant/.ssh/authorized_keys'
$ ssh root@YourVmIpAdddress 'chown -R vagrant:vagrant /home/vagrant/.ssh'
11. From your workstation, test your key and ensure that you can log in without a password. Then, test switching to root without a password.
$ ssh -i ~/vagrant-keys/vagrant vagrant@192.168.5.111
[vagrant@centos7-base ~]$ sudo su -
[root@centos7-base vagrant ~]#
12. While still logged in as root, clean up the disk space and the Bash history.
[root@centos7-base vagrant]# yum clean all
[root@centos7-base vagrant]# cat /dev/null > ~/.bash_history && history -c && exit
[vagrant@centos7-base ~]$ cat /dev/null > ~/.bash_history && history -c && exit
13. Log into the Proxmox Web UI and shutdown the container and then remove the network interface from the Network tab.
14. Log into the Proxmox server via SSH as root and use vzdump to create a backup of the new container. Note: For some reason you can no longer create GZIPed tarballs (*.tar.gz) using vzdump.
$ ssh root@pve-n1
root@pve-n1:~# vzdump 101 --node pve-n1 --mode snapshot --storage local --remove 0 --compress lzo
15. I could not find a clear guide on how to create an LXC template from an existing container. (Seems simple, right? Wrong!) So, I attempted a model similar to the method used for OpenVZ containers. Basically, take the container backup from the previous step, LZO uncompress and unpack the tar file into a temporary directory. Then, create a new compressed tarball using xz (tar with the -J option) and write it to the template directory.
root@pve-n1:~# mkdir /var/lib/vz/dump/tmp
root@pve-n1:~# cd /var/lib/vz/dump/tmp
root@pve-n1:/var/lib/vz/dump/tmp# lzop -d -c /var/lib/vz/dump/vzdump-lxc-101-2016_12_25-07_24_40.tar.lzo | tar -xf -
root@pve-n1:/var/lib/vz/dump/tmp# tar -cpJf /var/lib/vz/template/cache/centos-7-base_20161225_amd64.tar.xz .
root@pve-n1:/var/lib/vz/dump/tmp# cd ..
root@pve-n1:/var/lib/vz/dump# rm -rf tmp/
16. Confirm that you can see your new template under Storage View > node > local > Content in the Proxmox Web UI.

17. While Proxmox 4.4 uses *.tar.xz files for templates, the Web UI does not let you upload them. It only allows you to upload *.zip and *tar.gz. To work around this, scp our new template to the other nodes. They should be copied to the /var/lib/vz/template/cache directory. Once their, they will appear in the web UI.
Provision a Container with Vagrant
Before we can provision a container using Vagrant, we need to install a Vagrant plugin provider for Proxmox. At the time of this writing, I had many issues with the vagrant-plugin. I experienced issues on both Proxmox 4.4 and 3.4. After many debugging sessions I was able to patch the plugin using a couple of pull requests (for 4.x: pull request #26 and #32; for 3.4.x, they were my own). As such, the instructions below, detail the builds steps for my fork of the plugin.
Build the Plugin
These steps assume you are on a Mac. Getting Vagrant to work nicely under Windows is a pain due to long standing issues with the brittle rsync support, so setting up the plugin under Windows is outside the scope of this post.
Upgrade Ruby to the latest 2.x version.
$ brew install rubyOpen a new terminal and ensure that Ruby has been updated to the latest version.
$ ruby --version
 ruby 2.3.0p0 (2015-12-25 revision 53290) [x86_64-darwin15]
Clone this project and build the plugin.
$ git clone https://github.com/GastonGonzalez/vagrant-proxmox.git
 $ cd vagrant-proxmox
 $ gem install bundler
 $ bundle install
 $ rake build
Uninstall the
vagrant-proxmoxplugin if exists and install the plugin locally.$ vagrant plugin uninstall vagrant-proxmox $ vagrant plugin install pkg/vagrant-proxmox-0.0.10.gem $ vagrant plugin listAdd the dummy Vagrant box for this provider.
$ vagrant box add dummy dummy_box/dummy.box
Define a Vagrantfile
The Vagrantfile defined below is based on the settings used in this post and should be modified for your environment. The key areas to change are:
config.ssh.private_key_path - Set this to the private key path that we created earlier in this article.
config.vm.hostname - Set this to the hostname that you would like for your container / VM.
proxmox.endpoint - Replace the IP with any one of the nodes in your cluster.
proxmox.user_name - We created a vagrant user in this article using the PVE Realm. So, no changes are required here if you followed these same steps. If you want to use root (not recommended), use root@pam.
proxmox.password - Replace with the password that you set when you created the vagrant user account.
proxmox.openvz_os_template - If you followed the instructions to build a custom template using the instructions in this article, you should not need to change this file name. Also note, in a cluster, you need to ensure that this template is available on every node under: /var/lib/vz/template/cache.
proxmox.vm_storage - All LXC containers must be deployed to an LVM store. local-lvm is the default, so you should not need to change this value.
box.vm.network - Set the networking settings based on your network.
Once you have the Vagrantfile defined, provision it as follows:
$ vagrant up --provider=proxmox
Bringing machine 'box' up with 'proxmox' provider...
==> box: Creating the virtual machine...
==> box: Done!
==> box: Starting the virtual machine...
==> box: Done!
==> box: Waiting for SSH connection...
==> box: Done!
==> box: Rsyncing folder: /Users/gaston/tmp/proxmox4/ => /vagrant
Then, log in and enjoy your new container!
$ vagrant ssh
Last login: Sun Dec 25 21:40:54 2016 from 192.168.5.52
[vagrant@centos7-proxmox ~]$Conclusion
At this point, we have a fully open-source solution for provisioning containers using Vagrant on our own private virtualization infrastructure. While it was a bit of work to set up everything, it should now be a "frictionless" tool to allow us to do our jobs effectively. Any time we need a new VM, it should be a simple matter of defining a Vagrantfile and running vagrant up.
In the next post, we will focus on creating a provisioning script to provision SolrCloud using Vagrant. Until next time!
Appendix
A.1 Troubleshooting the plugin with stunnel and Wireshark
While I am very thankful for the work TELCAT MULTICOM GmbH did on the vagrant-plugin, I had many issues getting the plugin to work using OpenVZ containers under Proxmox 3.4 as well as issues with Linux Containers (LXC) under Proxmox 4.4. The primary challenge was the lack of useful error messages returned by the plugin. For example, nearly all failures in the plugin resulted in the following generic message:
$ vagrant up --provider=proxmox
Unable to communicate with proxmox server:
Unable to create the virtual machine!
Cause: VagrantPlugins::Proxmox::ApiError::ServerError
Secondly, the Proxmox proxy request log, provided little insight as well. It only indicated which API request failed, but not the details of the failure. For example:
root@pve-n1:~# tail -f /var/log/pveproxy/access.log
192.168.5.52 - - [27/Dec/2016:07:21:28 -0700] "POST /api2/json/access/ticket HTTP/1.1" 200 634
192.168.5.52 - - [27/Dec/2016:07:21:28 -0700] "POST /api2/json/access/ticket HTTP/1.1" 200 639
192.168.5.52 - - [27/Dec/2016:07:21:28 -0700] "POST /api2/json/access/ticket HTTP/1.1" 200 639
192.168.5.52 - - [27/Dec/2016:07:21:28 -0700] "POST /api2/json/access/ticket HTTP/1.1" 200 637
192.168.5.52 - vagrant@pve [27/Dec/2016:07:21:28 -0700] "GET /api2/json/nodes HTTP/1.1" 200 771
192.168.5.52 - vagrant@pve [27/Dec/2016:07:21:31 -0700] "GET /api2/json/cluster/resources?type=vm HTTP/1.1" 200 11
192.168.5.52 - vagrant@pve [27/Dec/2016:07:21:31 -0700] "POST /api2/json/nodes/pve-n1/lxc HTTP/1.1" 500 13
Clearly, we can see that the POST request to /api2/json/nodes/pve-n1/lxc is failing, but why? Given that all requests to the Proxmox API take place over HTTPS, we can't simply watch the packets using a network sniffer to inspect the request and response.
After a bit of thought, my solution was simple: Create a local HTTP tunnel to the Proxmox server using stunnel. With this approach we can have stunnel listen on a local port using HTTP and tunnel the traffic over TLS to Proxmox, thereby allowing us to sniff the packets.
As always, these instructions require a Mac.
1. Install stunnel on your Mac.
$ brew install stunnel2. Create a minimal stunnel configuration file (/usr/local/etc/stunnel/stunnel.conf). Change the output log path and the connect settings. The value for connect should be your Proxmox server.
$ vi /usr/local/etc/stunnel/stunnel.conf

   output = /Users/gaston/stunnel.log
   client = yes

   [http]
   accept  = 8006
   connect = 192.168.5.110:8006
   TIMEOUTclose = 0
3. Start stunnel.
$ sudo stunnel4. Download and install Wireshark.
5. Start Wireshark and capture packets on the loopback interface.
6. Set the Wireshark filter to: http and tcp.port == 8006.
7. Update your Vagrantfile to refer to your local machine over HTTP as the Proxmox endpoint.
#proxmox.endpoint = 'https://192.168.5.110:8006/api2/json'
proxmox.endpoint = 'http://localhost:8006/api2/json'
8. Run vagrant up and watch the API HTTP POST requests to Proxmox and the response.
As an example, I updated my Vagrantfile and incorrectly defined the proxmox.openvz_os_template to refer to a nonexistent template. When we look at Wireshark, we can clearly see the HTTP 500 response and error message indicating that the volume does not exist.